Showing posts with label SEVENTEEN. Show all posts

Thursday, 31 July 2014

World Cup Nails - Team Germany (The Winners)


First of all I must say congratulations to Team Germany on their success in winning the World Cup especially as they're the first European country to win a World Cup in Las Americas!!
As I have watched almost every game it was much deserved, even though I was rooting for any South American country....(apart from Brazil since they took out Colombia!) So of course I was ecstatic they beat they were beat by 7.1 !!!

Anyway enough of the footie and on to the beauty. I decided even though it is over to at least award them with their own set of nail art!
 
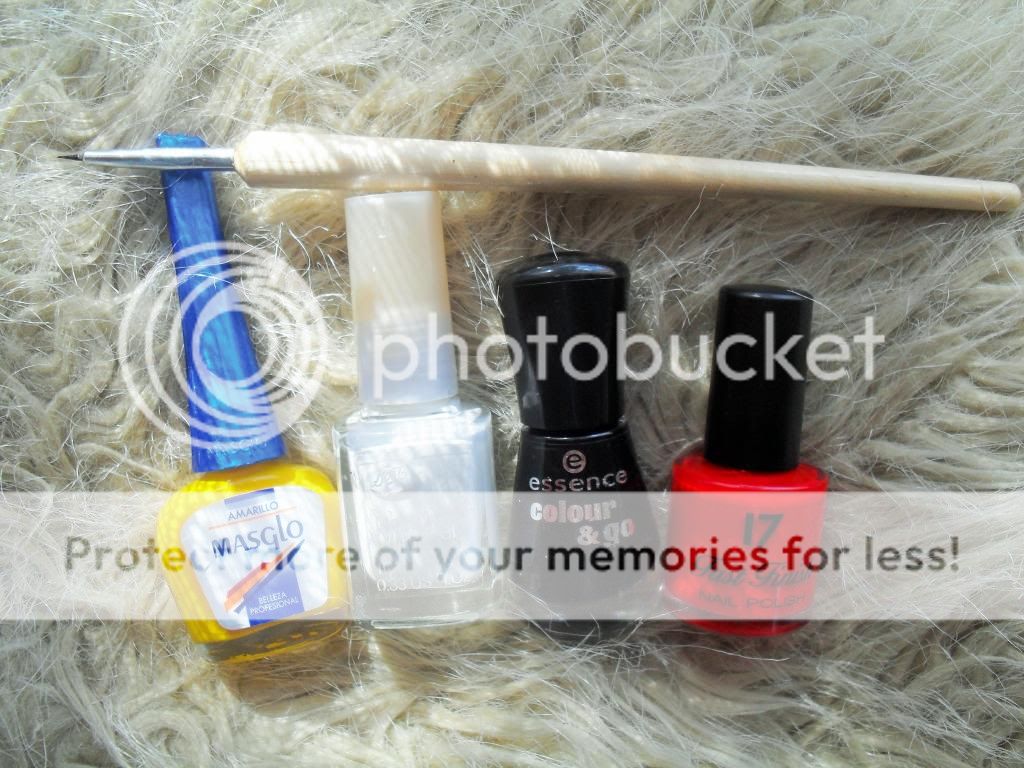
So for these nail polishes I used for this design: Masglo - Amarillo, White - Boots, Essence - Back to Black, SEVENTEEN - Knockout Red and of course my nail art brushes!

So once you have your polishes ready, follow these instructions:
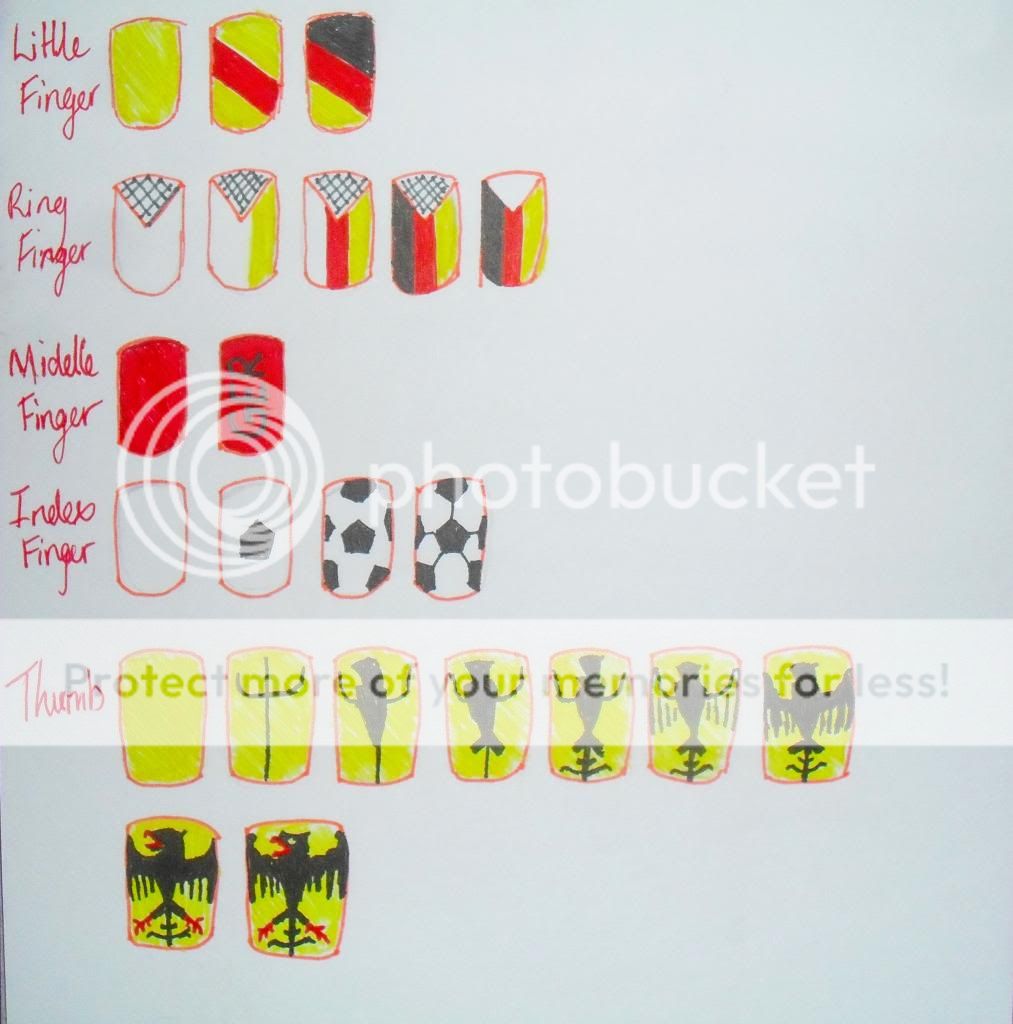
 
Here are a little tips and tricks to help you perfect this design:
Have PATIENCE and make sure your in the right mood (aka CALM mood) so you can try these!
Make sure the base colours are completely dry before drawing any art on top.

RING FINGER
  • Masking Tape I would suggest adding a corner of a piece of masking tape, draw the lines then remove masking tape and fill in white.
OR
  •  Paint the entire nail white, draw an upside down triangle in a light colour. Then draw the stripes up to the triangle.

INDEX FINGER - (click --> here <-- for details to help you achieve this.

THUMB
  1. Paint Base Coat. (Please wait till 100% dry!!) 
  2. Draw a cross with raised up arms down the middle of your nail.
  3. Then from a little above where the lines cross draw an upside down triangle  and a filled in semi-circle so it can look like a bird. 
  4. From the bottom of the triangle draw two lines (arrow pointing upwards shape)
  5. Draw two semi-circles, but add a small downward flick at the end of the bottom one.
  6. Then draw 4 lines coming down from the arms to create the wings (make them smaller as they go in)
  7. Fill in the wings and try and make the top part thicker.
  8. With a Red add the claws to the arrow pointing upwards shape and the beak. Make sure the top beak has a downward flick.
  9. Add the finishing touches with a white to make the eye, and with the black flatten the head with a flick at the end and add 3 muscle like shapes to the top of the wings!

So let me know what you think guys! Would you like to see other countries even though it's no longer the World Cup?
If you try these or have you own tag me on Twitter or Instagram @lovefromangelic so I can see!!

L.F.A. Xx

Tuesday, 24 June 2014

World Cup Nails - Team Colombia


As a Colombian (that's in South America in case any of you don't know where it it. No I'm not demeaning your intellect but I've been asked way to many tomes where it is.) I'm incredibly proud by how far we've gotten especially as Radamel Falcao our key star player was left out of the World Cup! Bit thankfully we pulled through and have presented some amazing goals!


Anyway as an homage to my glorious birth country I have designed these nails in case any of you are Team Colombia!! These are relatively easy so any of you guys could try these too!
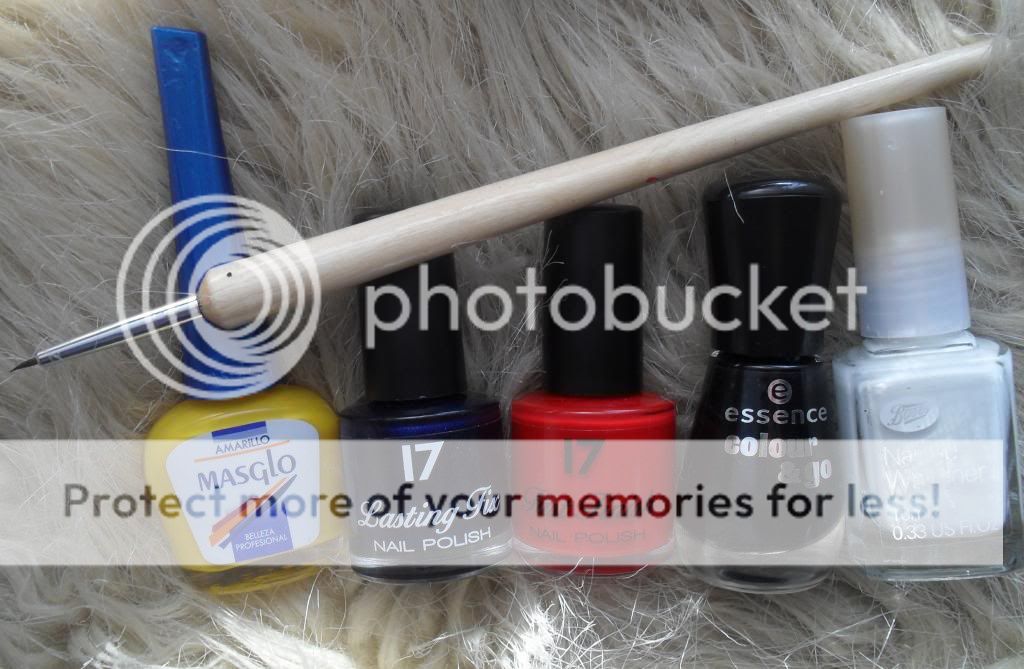
The nail polishes I used were the Masglo - Amarillo (from Colombia!), 17 (SEVENTEEN) - Midnight Sapphire and Knockout Red, Essence Black is Back and Boots White, and y nail brush from eBay.


So again like last time here are some tips and tricks so that your can achieve the same look!
  • This nail design took me about 10-15 minutes so not particularly long but you will need to have PATIENCE and be CALM.
  • Make sure each coat is completely dry so that no bleeding or changing colour occurs.
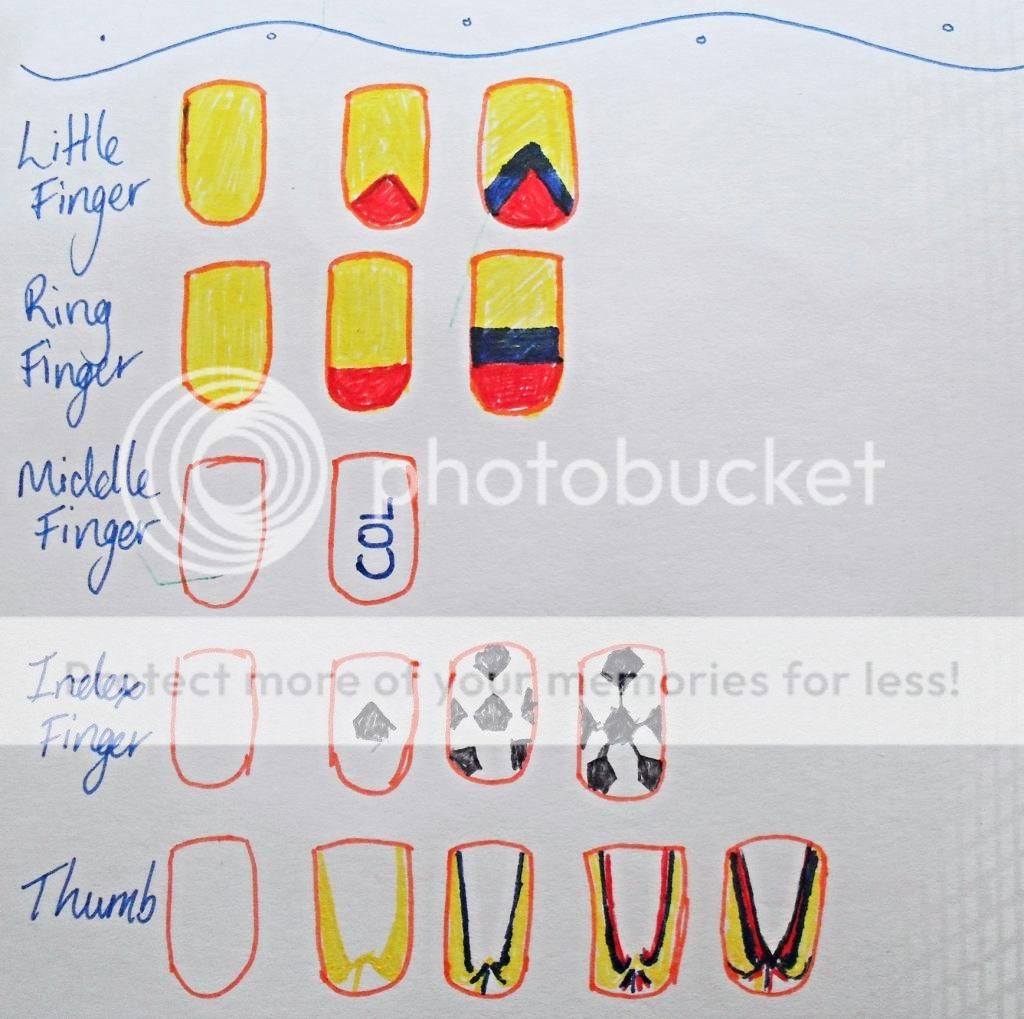
  • MIDDLE FINGER- I shortened Colombia to COL as my nail isn't long enough!
  • INÐEX FINGER - (Bullet Point 4 for extra detail.) 
  • THUMB - If you look up "Colombia Coat of Arms" for a clearer view of what your drawing but your basically drawing to wings with the Colombian flag with the yellow outwards. And then finish off with a thin black line on the inside and on the put of the yellow.

I hope you guys try this nail design! Remember send me or tag me on Instagram or Twitter @lovefromangelic with your Team Colombia Nail Designs or any other team as I love nail art!

L.F.A. Xx

Friday, 20 June 2014

World Cup Nails - Team England

To say I'm devastated that England didn't make it through is an understatement, but there is still one game left and hopefully England will go out with a Bang! And you can try and sport these nails for the match.

These are relatively easy apart from the Index Finger and the Thumb. The thumb in particular sports on the iconic Lions on the England shirt but is incredibly difficult to do and requires a lot of patience and adjustment depending on the size of your nail.
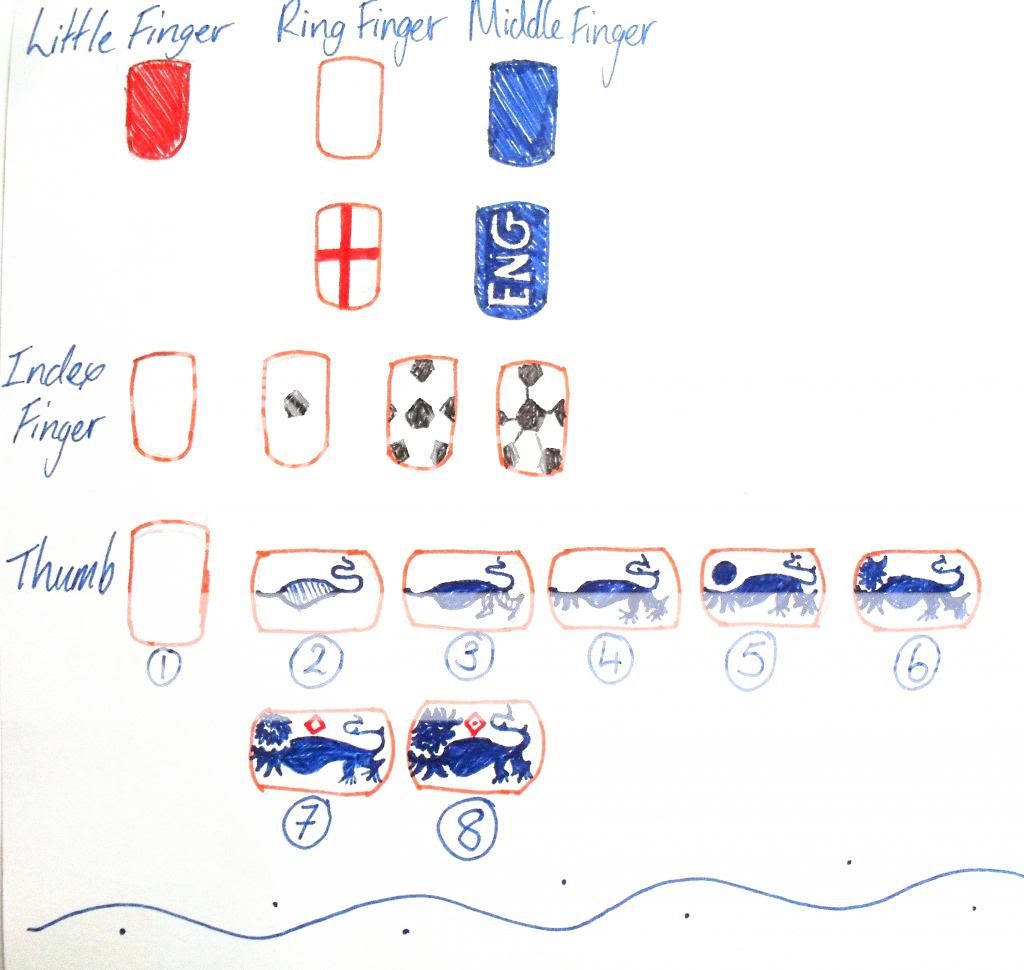
Again like the last nail design I drew the instructional plans afterwards as its trial and error when I do it as I'm not always sure whether I'll be happy with the end result.

The colours I used for these designs were the: MaxFactor Glossfinity - Colbat Blue, 17 (SEVENTEEN) - Midnight Sapphire and Knockout Red, Essence- Black is Back, and Boots - White. And the nail brush is from my eBay haul but the paint rubbed off. However I will explain all that in a different post.

So now to create these nails follow these instructions:
As you can see the lion has changed many shapes numerous times hehehe sorry I can't always make it identical!

 Here are a couple of tips to help you, and I will do numerical instructions for the thumb so that you may fully get the help you need!
  • Make sure you are CALM and have PATIENCE as this should take you about 25-30 minutes to do this (of course it can be quicker or slower depending on you)
  • INDEX FINGER (See 3rd Bullet Point -->here<--)
Now for the Thumb:
  1. Paint your white base coat and make sure it completely dries.
  2. With either your Nail Art Brush or (my 17 - Midnight Sapphire nail polish already comes with an nail art thin brush) draw the lions arm, main body and tail. Its easier if you keep it all in one line and make sure you make the underbelly closer to the arm than the tail. And Fill in.
  3. Draw in both of the legs and fill in.
  4. Add in a couple of lines for fur on the arm, claws on the leg, and a couple of spikes on the heel of the backlog and on the tail.
  5. Pick up excess nail polish let it drip to the bottom of the brush to form a small circle and place it above of the arm. 
  6. While wet drag the brush from the centre to the outside to form the lions mane. And on the arm draw tiny semi circles for emphasis on the main.
  7. Now with a nail art brush or white add eyes, nose and mouth. And with a red draw a small diagonal above the main body.
  8. Add a dot to the centre of the diamond. Wait until everything is dry and top of with a top coat!

I really recommend you look up and refer back to picture so you can see why you need all those little touches, and so you get a better picture, of how it should look.

So let me know if you guys try it! Tag me or send me photos of your own Team England Nails to @lovefromangelic on both twitter and Instagram! And send me some suggestions for other team nails!
 

L.F.A. Xx

Wednesday, 18 June 2014

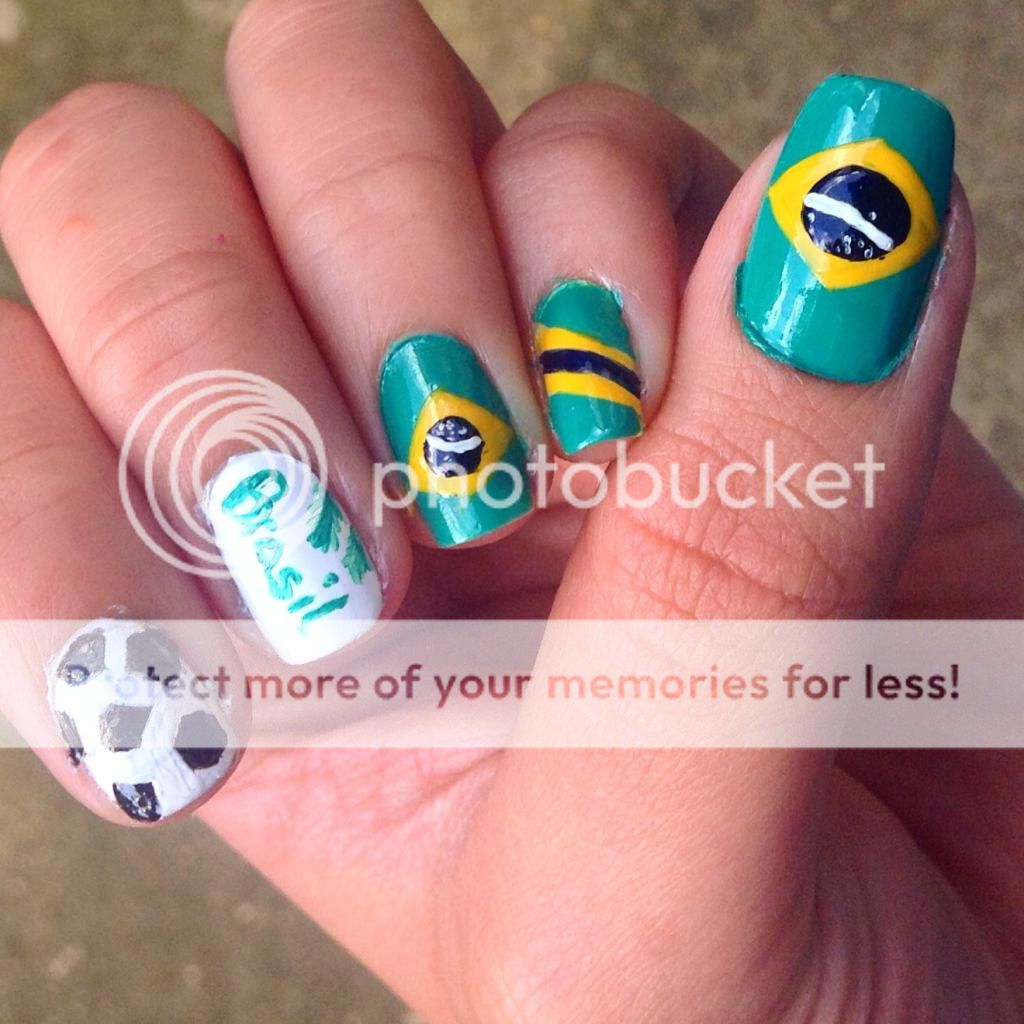
World Cup Nails - Team Brazil

Please Excuse the messy nails and bad quality photo!
 The World Cup isn't just for the Lads! Us girls can also love it (probably the only time I fully commit to watching football) and of course we can support all the while having a good manicure!
So if your Team Brazil why not try these beautiful nails! Now these do require some patience and a level of "nail art talent?" But there is a design for every level of artistry! So mix and match or try one of these out!
 
 
As you can see I chose an array of nail polishes and brushes to complete this design. They are: Nails Inc. - Queen Victoria Street, Essence - Black is Back, 17 (SEVENTEEN) - Midnight Sapphire and Mini Skirt, and last but not least a Latin American Brand (Aunt brought me them from Colombia) Masglo - Amarillo (Yellow). And the brushes I got from eBay!

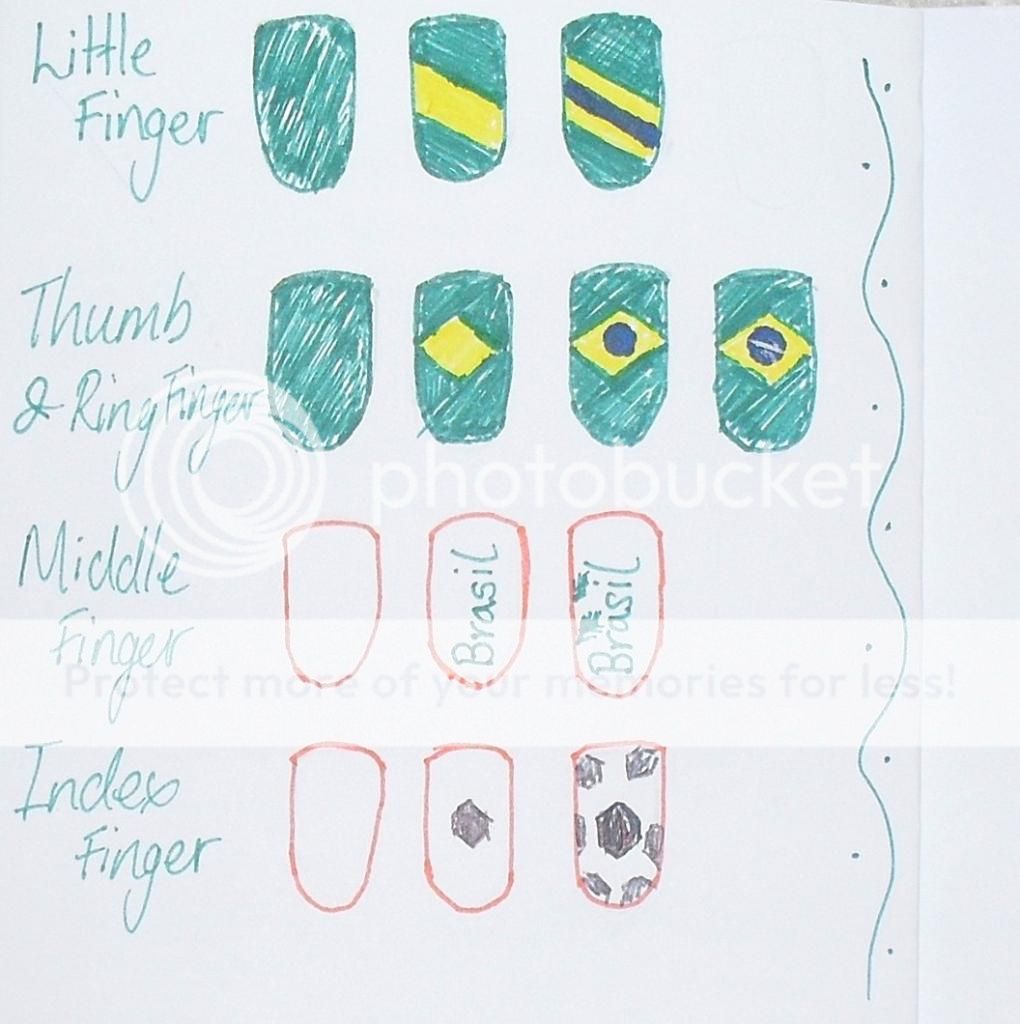
Now as you can see I have drawn a step by step guide to how you can do these yourselves. So girls why not follow these instruction:

Unfortunately I didn't take a picture of me doing them at the same time because quite frankly I wasn't sure how they were going to turn out and waste planning on doing a post but since they came out nicely I changed my mind so you guys could do it too! here are some tips so you can achieve this:

  • This will take time so have PATIENCE, be CALM and you will see that your hand becomes steadier.
  • Okay when you are going to do the circle for the Brazilian flag you can use a nail dotter if you have one (it would be easier but I don't have one) or don't clean your brush around the edges and you will see that the excess nail polish will begin to drip down to the end of a brush forming a ball like shape so all you need to do is place it on the centre of the 'Yellow Diamond'
  • You can leave the 'Brasil' on its own but I decided to just add a couple of leaves as rainforest inspiration.
  • Lastly for the football do a 'Pentagon Shape' and for each corner draw another pentagon with a little space between.

Guys if you try any of these please send me a photo! Tag me on Instagram or on Twitter with @lovefromangelic as I really want to see you guys try these!!
If you have any questions ask away and I will bet back to you asap!

 L.F.A. Xx

Thursday, 4 July 2013

Happy 4th July Nails.!.!.!

Happy 4th of July to everyone and anyone celebrating.!.! 
This day inspired me to be creative and design creative patriotic nails.!.!


Alright. I may not be American but I still love these colours, and it was a lovely challenge to paint these on. Plus nail art should be fun.!.! 

Oh the irony. I know this is the 17 BEST OF BRITISH Nail Art Kit but the colours and type of brush were ideal to recreate the American Flag.
17 (SEVENTEEN) - Midnight Sapphire, Mini Skirt, and Knockout Red
Thin Brushes are perfect for nail art as it gives you the opportunity for detail. Also if you can't find these brushes you can make them yourself with an old nail varnish brush. (wash it, remove all nail polish remnants, and trim to the brush thickness you desire.)

If you want to recreate this then:

  • Paint your base colour White (it'll be easier and help the other colours stand out.!.)
  • With the Sapphire Blue paint a "V" shape at the top of your nail and try to make the "V" angular. (like a corner of a square.
  • Fill in the "V" Shape completely and make sure its dry.!.
  • With Knockout Red draw stripes! and try to make them equally apart. And if you look at a flag you'll notice one of the red stripes continues from the Stars section.....sooo start from there. 
  • Now we have 3 Options for the style of stars you want for decoration!
    • You can add the Star Nail Art (Topshop) which you may have seen before. And it gives it a cute, child-like appearance.
    • Or for a more authentic look you could draw on the stars individually with the Mini Skirt nail polish.
  • Then let this completely dry and top it off with a Top Coat.!.

P.S. Which one do you guys prefer? Nail Art Stars or Nail Design Stars?

L.F.A. Xx

Thursday, 6 June 2013

Aztec Pattern Inspired Nails

While studying for exams may be taking all of my free time, I still try to find leave some for myself. And while thinking of what to do I found myself being inspired from the top I was wearing, and created these Aztec Nails.!.

These did take a lot of concentration and time to get the shapes I wanted and to be honest I almost gave up before the black outline, because it looked really weird without it...

Primark mens top for £2.50
My inspiration came from this top that I bought ages ago. I just fell in love with all the shapes and colours. I decided to only do the odd shapes on my nails for a minimalist look to it! Unfortunately I didn't have that exact blue or a yellow and so instead I went for an Orange and a Lighter Blue.

17 - Bolt from the Blue, Maybelline - 554 Lavender Lies, L.A. Colors - Orange & Black,
Colour Couture  
- Top Coat + A toothpick.
So try to paint these nails too! Just have fun with it. Try loads of different shapes and colours! 

P.S. Feel free to let me know the designs you did! I would love to see others try these nails too!


L.F.A. Xx


Monday, 3 June 2013

Blue Star Nail Art (Topshop)


I decided to do this really cute blue star nail art design for one of my besties birthday dinner..(because she's a star ;)

As these Stars were white with a dark and light blue outline I decided to use my 17 Fast Finish Nail Polish in Bolt from the Blue as the base colour to help the star stand out but to also follow the Pastel trend.
You can get these Stars from the Nail Art packet from Topshop for only £2.50.!.

So if you want to do these:
  • Paint your nails a plain light blue colour. ((Make sure they are completely dry!!!!)) 
  • Then take the Stars out and get them ready. 
  • With a clear nail polish paint a dot to the area you will stick it to. 
  • Stick the Star onto the dot and hold it down till dry. 
  • Then paint over the nail and star again in clear nail polish to fully secure it in place!

You can use other colour combinations but I thought this would look the cutest and most subtle.

P.S. These Stars are little harder to stick than the bows from my previous post: "French Pink Bow Nail Art (Topshop)"as they have five thin corners.!. So I would suggest using a needle to press each corner individually as its close to drying.

L.F.A. Xx