Friday, 15 August 2014

Sanctuary Spa Relax Cocooning Body Butter

"Blended with essential oils to help relax &calm the mind, providing a gentle unwind to a stressful day."

You may remember for Christmas I got one of the Sanctuary Spa Body Butter Gift Set with 3 of their body butters (Cocooning, Mandel Lular and their Original Body Butter). Today I will be reviewing their Cocooning Body Butter 100ml!
I had never tried any of Sanctuary Spa Products before so I was looking forward to it, especially as I heard that they were very good.

This particular one is meant to help calm and unwind after a long stressful as it contains:
"Vetivert - Helps to calm the mind,
Cederwood - Helps promote clarity, 
Labdanunm - Helps to provide relaxation "
 
It also contains Shea, illipe (a butter pressed from tree nuts) and sacred lotus so its meant to be incredibly moisturising and perfect for dry skin. As you can tell from the ingredients (illipe and sacred lotus) are considered mainly Asian (Malaysian and Chinese) so it is expected that the overall fragrance is very Oriental and deep. This is further reinforced as you see a Koi Fish shadow on the packaging which I thought was a cute touch.


However contrary to what its meant to do I did not find this relaxing at all, which was very disappointing to me as it states its meant to relax. The scent wasn't overly strong which I like, but it want exactly phenomenal either. It was intriguing though as its a very deep unusual scent, that honestly I can't place! (sorry I suck at describing scents!)
Now the consistency is lovely! Its nice and thick but not so stiff that its hard to use. So it's perfectly easy to massage it into the skin! It is actually very moisturising and leaves the skin feeling nice and soft.

Overall this is a lovely body cream but I don't think I'd be repurchasing this for myself as the scent just didn't quite match with me. I do recommend you try it as it is cheaper then other brands (i.e. Body Shops 200ml for £13). Lastly if you don't like strong scents this might just be perfect for you as it is very understated and muted scent.

You can get this from:
Sanctuary Spa: £9.50 for 200ml
 
L.F.A. Xx

Monday, 11 August 2014

Lush Tisty Tosty Bath Bomb


Its been a while since I treated myself to a good long relaxing bath, and so I thought I should try the Tisty Tosty Bath Bomb.
As you can see this lovely bath bomb has been shaped into a lovely heart shape with Rose Buds Embedded into it (7 of them) which float on the bath once the bath bomb dissolves. According to Lush's website  some of the main ingredients are:
"Citric Acid (Lemon),
Rose Oil (Lifts your spirits),
Geranium Oil (Toning and Balancing effect),
Jasmine Absolute (Oil that's a beauty tonic and perfume)"

These all contribute to the overall floral and relaxing scent. Especially if you break apart the rose buds that come embedded, the scent really is much more powerful. It also dissolves into the bath leaving a clear-whitish colour and lovely rosebuds floating on top. My skin was left feeling smooth and lovely also!
My only complain would be the size. For the same price I could a much larger bath bomb, however those baths don't have such luxurious ingredients like Real Rose buds, so in a way you do get what you pay for.

I would really recommend this if your feeling down or need a lovely luxurious bath! So have you tried it and what were your thoughts??

You can get this at Lush for £3.25

L.F.A. Xx

Friday, 8 August 2014

Allura Foundation Brush (Poundland)


As someone who only recently started using brushes in my makeup routine (I know....don't kill me for it!) I know that there are soooo many different types of foundation brushes from, Stippling to Flat, and different price ranges going from £1 to £50+! So I just wanted something simple and cheap to try so that I would find out if I should just stick to using my fingers instead. Therefore while shopping in Poundland I got myself the lovely Allura Foundation Brush! (£1)

 
As you can see this fits the bill for the usual flat foundation brush and this comes with synthetic brushes that are white with a pink end. (Very cute as it goes with the case colour scheme it comes in!) But obviously as it is stark white, due to the foundation it has actually stained which is a same, however I was expecting it to.
It's also quite soft (or at least a lot softer than what I was expecting) and I do like the sleek black handle has it makes it look very chiq. It doesn't go with my EcoTools Brushes however it does go with some brushes from Essence that I will review once I use them!


Please excuse my terrible streaky nails!!!

As I had never used brushes before I did have to practice a while till I fully got the hang of it! At first I'd find that my makeup was streaky, however once I did I found that it did the job marvellously! My makeup looks amazing, not streaky at all and I find that it helps me get an even coverage (compared to when I used my hands...)
Of course I have never tried any other foundation brushes so I have nothing to compare it to, but I actually love it and have not stopped using it! Also although it's a flat brush it does fan out a little but not so much as to damage the brush!

So if your looking for a foundation brush on the cheap! Definitely try this!

L.F.A. Xx

Thursday, 31 July 2014

World Cup Nails - Team Germany (The Winners)


First of all I must say congratulations to Team Germany on their success in winning the World Cup especially as they're the first European country to win a World Cup in Las Americas!!
As I have watched almost every game it was much deserved, even though I was rooting for any South American country....(apart from Brazil since they took out Colombia!) So of course I was ecstatic they beat they were beat by 7.1 !!!

Anyway enough of the footie and on to the beauty. I decided even though it is over to at least award them with their own set of nail art!
 
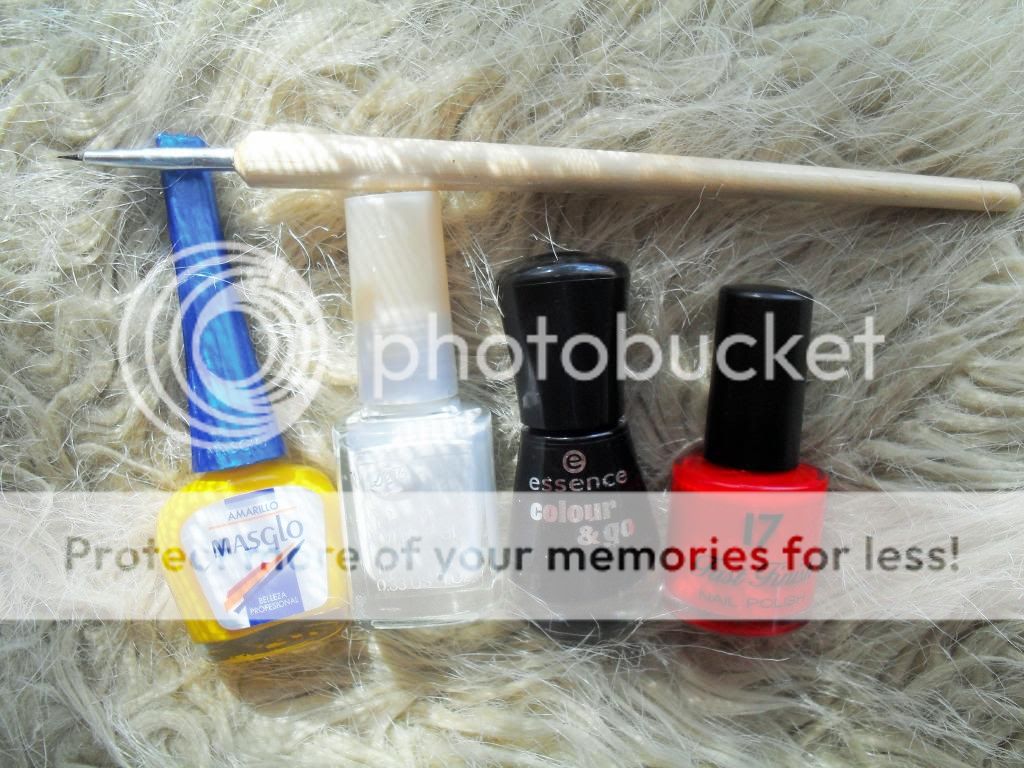
So for these nail polishes I used for this design: Masglo - Amarillo, White - Boots, Essence - Back to Black, SEVENTEEN - Knockout Red and of course my nail art brushes!

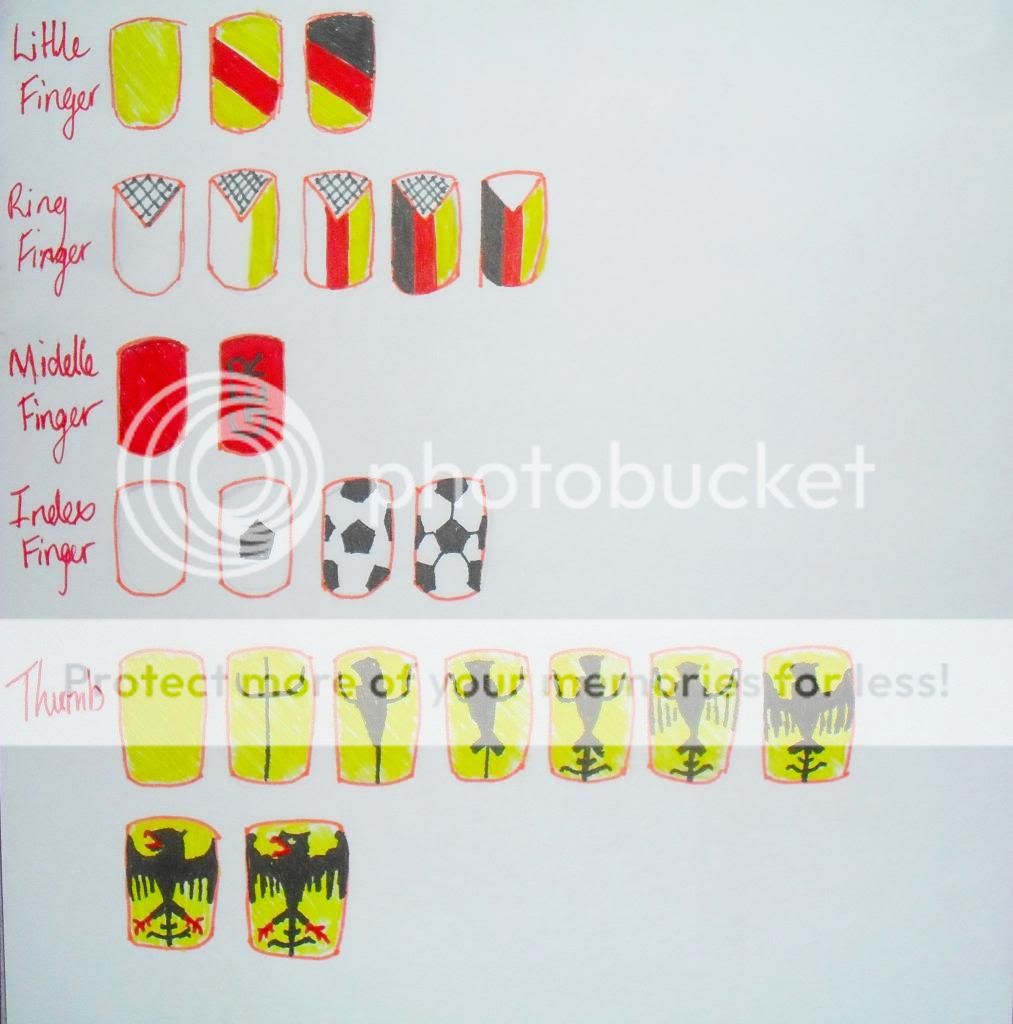
So once you have your polishes ready, follow these instructions:
 
Here are a little tips and tricks to help you perfect this design:
Have PATIENCE and make sure your in the right mood (aka CALM mood) so you can try these!
Make sure the base colours are completely dry before drawing any art on top.

RING FINGER
  • Masking Tape I would suggest adding a corner of a piece of masking tape, draw the lines then remove masking tape and fill in white.
OR
  •  Paint the entire nail white, draw an upside down triangle in a light colour. Then draw the stripes up to the triangle.

INDEX FINGER - (click --> here <-- for details to help you achieve this.

THUMB
  1. Paint Base Coat. (Please wait till 100% dry!!) 
  2. Draw a cross with raised up arms down the middle of your nail.
  3. Then from a little above where the lines cross draw an upside down triangle  and a filled in semi-circle so it can look like a bird. 
  4. From the bottom of the triangle draw two lines (arrow pointing upwards shape)
  5. Draw two semi-circles, but add a small downward flick at the end of the bottom one.
  6. Then draw 4 lines coming down from the arms to create the wings (make them smaller as they go in)
  7. Fill in the wings and try and make the top part thicker.
  8. With a Red add the claws to the arrow pointing upwards shape and the beak. Make sure the top beak has a downward flick.
  9. Add the finishing touches with a white to make the eye, and with the black flatten the head with a flick at the end and add 3 muscle like shapes to the top of the wings!

So let me know what you think guys! Would you like to see other countries even though it's no longer the World Cup?
If you try these or have you own tag me on Twitter or Instagram @lovefromangelic so I can see!!

L.F.A. Xx

Tuesday, 1 July 2014

World Cup Nails - Argentina


If your are keeping up with the World Cup we now know all the groups that have qualified for the next round and Argentina is one of them, going to the quarter finals!!!
So if you want to support this Team why not give yourself this Team Argentina mani!
 

Now I will admit all of the nails are relatively simple but the Thumb. So if you want to have a crack at all of them kudos to you if not you can always repeat and change it up a little!
The polishes I used were, Masglo - Amarillo, Essence - Once Upon a Time... and Black is Back, Nails Inc. - Queen Victoria Street, BarryM Gelly Hi-Shine - Blueberry, and Boots - White.
Initially I wasn't entirely convinced that Blueberry was the exact shade if blue for the Argentinian flag however after much deliberation I think this is as close as I could possibly get so don't kill me if it's bit off!!!

So to recreate these nails follow these instruction:


Of course here are some tips and tricks for you to be able to achieve this easier!
  • These took me a good 20-30mins to create because of the thumb, so I suggest you be PATIENT and are in a  calm or creative mood!
  • For clearer tips on how to create the index read the 4th Bullet point --> here<--
  • Make sure you base colours are completely dry before attempting any  

THUMB 
  1. First of all try and draw a circle onto the nail as a guide for the entire shape. 
  2. Then draw 4 long triangles pointing outwards. (Horizontal and Vertical)
  3. Draw another 4 Triangles pointing outwards. (In between each horizontal and vertices triangle)
  4. On either side of each point draw a squiggle (almost like a stretched out/elongated "S") Try and make it that all are facing the same way but if you can't that's fine. 
  5. Now with a darker colour preferably a brown/bronze draw a thin outline for each sun ray. (I only had a metallic bronze and to be honest I think it makes it looks much better since the sun is meant to be bright and shinning) TIP - it may be easier to start the line from the point down back to the centre.
  6. Now with the same colour outline the circle to define the centre/face of the sun.
  7. OPTIONAL - Finally only if you really feel up to the task and confident you can attempt to draw in some eyes, nose and mouth. (Because in the Argentinian flag the sun has a face)
  • TIP - try and make your brush as flat as possible by taking off any excess and leaving the lowest amount of product possible, and when re-dipping try to only get nail polish onto the tip of the brush.

So guys let me know what other countries you want to see and if you try these please tag me @lovefromangelic on Twitter or Instagram as would love to see how your supporting your country and of course Team Argentina!


L.F.A. Xx

Tuesday, 24 June 2014

World Cup Nails - Team Colombia


As a Colombian (that's in South America in case any of you don't know where it it. No I'm not demeaning your intellect but I've been asked way to many tomes where it is.) I'm incredibly proud by how far we've gotten especially as Radamel Falcao our key star player was left out of the World Cup! Bit thankfully we pulled through and have presented some amazing goals!


Anyway as an homage to my glorious birth country I have designed these nails in case any of you are Team Colombia!! These are relatively easy so any of you guys could try these too!
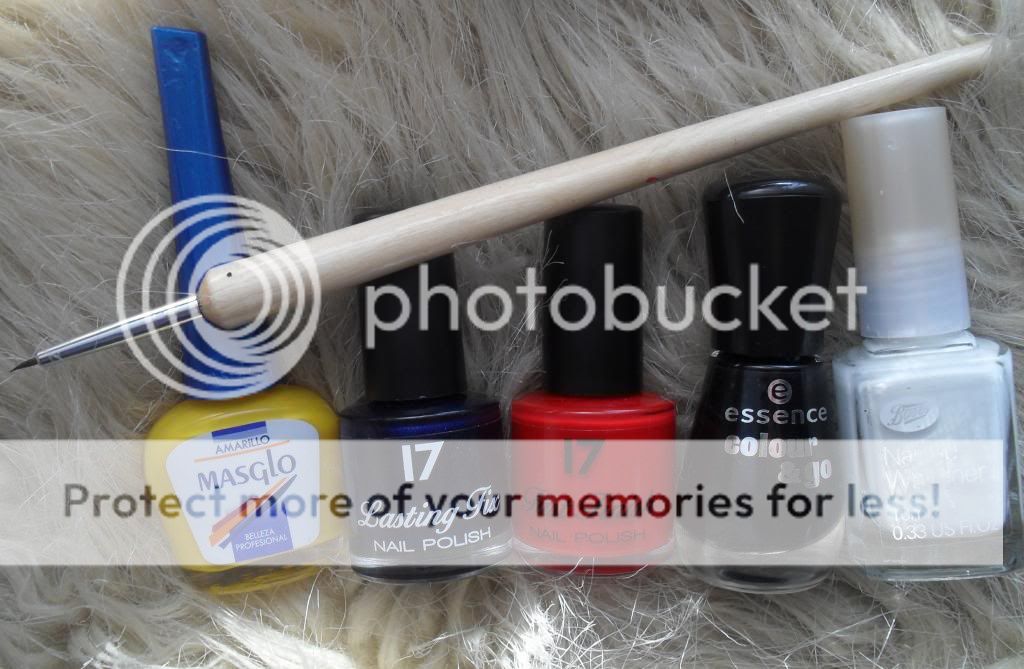
The nail polishes I used were the Masglo - Amarillo (from Colombia!), 17 (SEVENTEEN) - Midnight Sapphire and Knockout Red, Essence Black is Back and Boots White, and y nail brush from eBay.


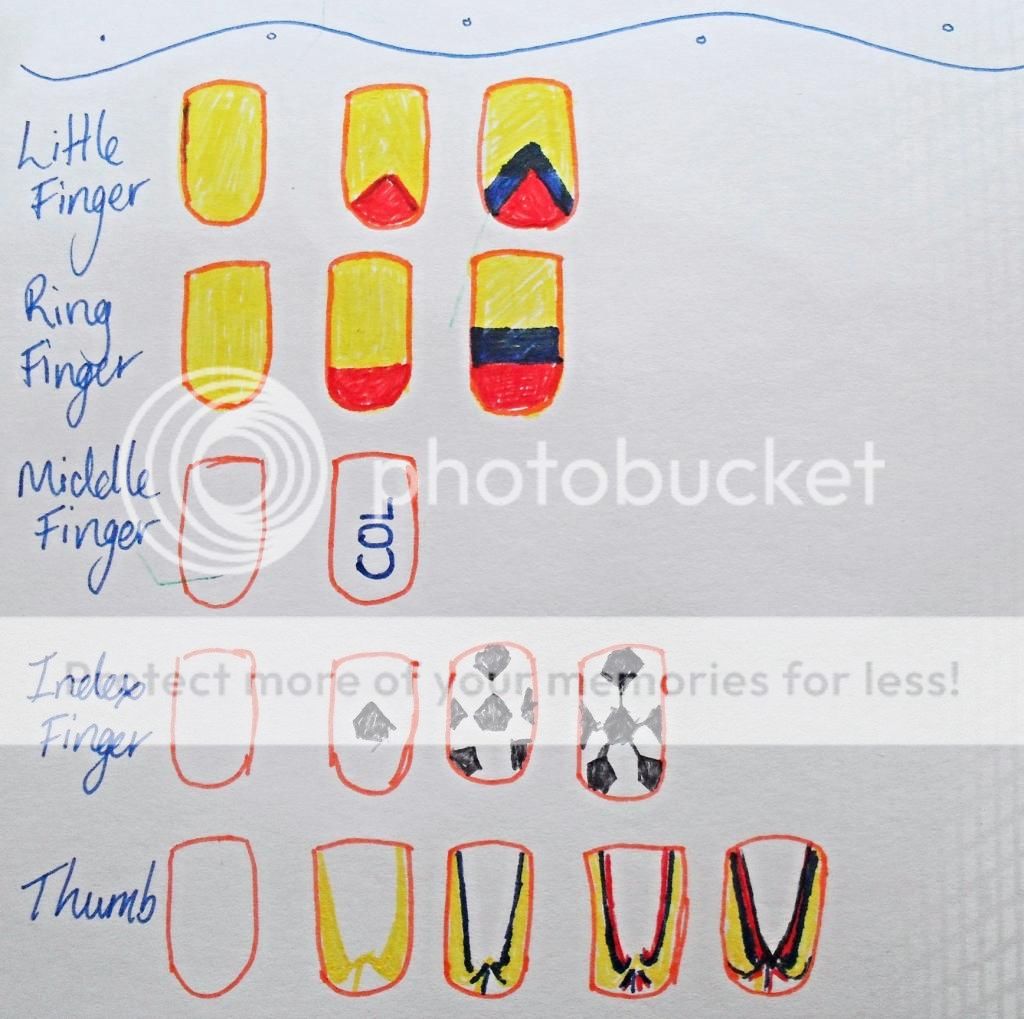
So again like last time here are some tips and tricks so that your can achieve the same look!
  • This nail design took me about 10-15 minutes so not particularly long but you will need to have PATIENCE and be CALM.
  • Make sure each coat is completely dry so that no bleeding or changing colour occurs.
  • MIDDLE FINGER- I shortened Colombia to COL as my nail isn't long enough!
  • INÐEX FINGER - (Bullet Point 4 for extra detail.) 
  • THUMB - If you look up "Colombia Coat of Arms" for a clearer view of what your drawing but your basically drawing to wings with the Colombian flag with the yellow outwards. And then finish off with a thin black line on the inside and on the put of the yellow.

I hope you guys try this nail design! Remember send me or tag me on Instagram or Twitter @lovefromangelic with your Team Colombia Nail Designs or any other team as I love nail art!

L.F.A. Xx

Friday, 20 June 2014

World Cup Nails - Team England

To say I'm devastated that England didn't make it through is an understatement, but there is still one game left and hopefully England will go out with a Bang! And you can try and sport these nails for the match.

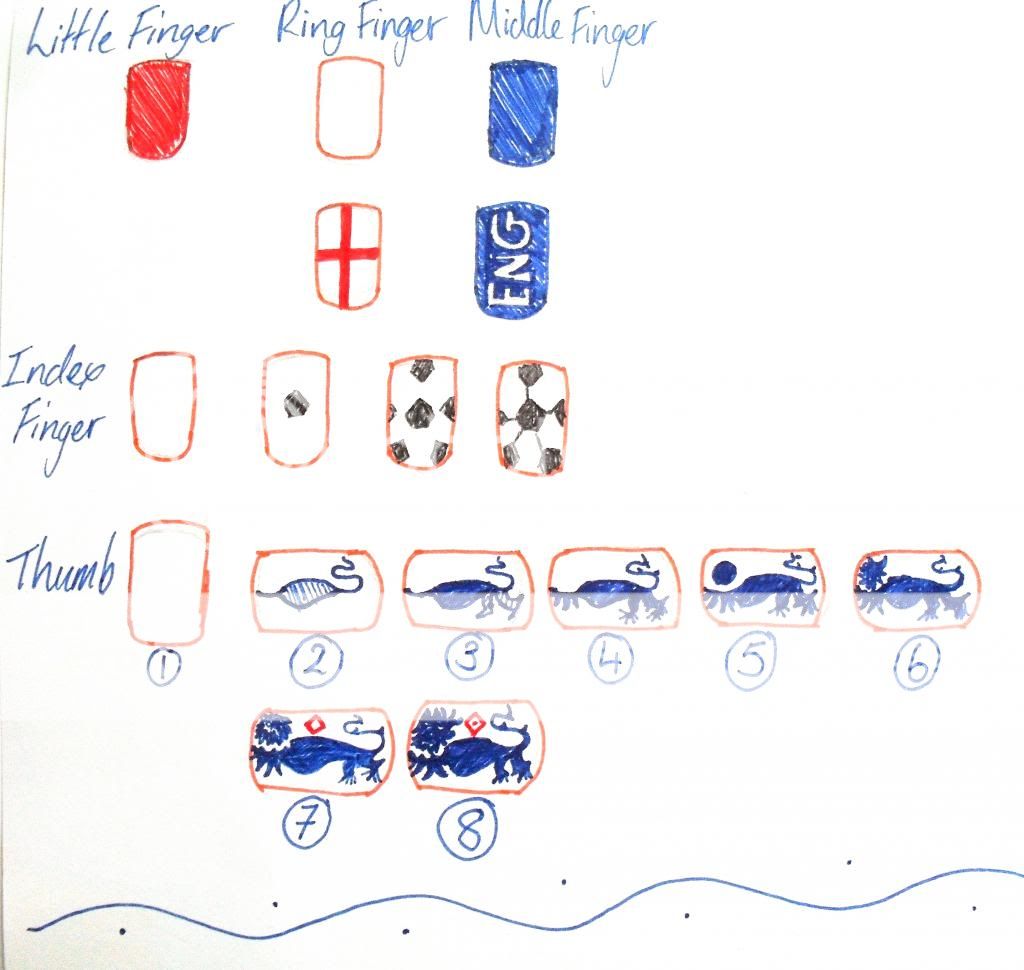
These are relatively easy apart from the Index Finger and the Thumb. The thumb in particular sports on the iconic Lions on the England shirt but is incredibly difficult to do and requires a lot of patience and adjustment depending on the size of your nail.
Again like the last nail design I drew the instructional plans afterwards as its trial and error when I do it as I'm not always sure whether I'll be happy with the end result.

The colours I used for these designs were the: MaxFactor Glossfinity - Colbat Blue, 17 (SEVENTEEN) - Midnight Sapphire and Knockout Red, Essence- Black is Back, and Boots - White. And the nail brush is from my eBay haul but the paint rubbed off. However I will explain all that in a different post.

So now to create these nails follow these instructions:
As you can see the lion has changed many shapes numerous times hehehe sorry I can't always make it identical!

 Here are a couple of tips to help you, and I will do numerical instructions for the thumb so that you may fully get the help you need!
  • Make sure you are CALM and have PATIENCE as this should take you about 25-30 minutes to do this (of course it can be quicker or slower depending on you)
  • INDEX FINGER (See 3rd Bullet Point -->here<--)
Now for the Thumb:
  1. Paint your white base coat and make sure it completely dries.
  2. With either your Nail Art Brush or (my 17 - Midnight Sapphire nail polish already comes with an nail art thin brush) draw the lions arm, main body and tail. Its easier if you keep it all in one line and make sure you make the underbelly closer to the arm than the tail. And Fill in.
  3. Draw in both of the legs and fill in.
  4. Add in a couple of lines for fur on the arm, claws on the leg, and a couple of spikes on the heel of the backlog and on the tail.
  5. Pick up excess nail polish let it drip to the bottom of the brush to form a small circle and place it above of the arm. 
  6. While wet drag the brush from the centre to the outside to form the lions mane. And on the arm draw tiny semi circles for emphasis on the main.
  7. Now with a nail art brush or white add eyes, nose and mouth. And with a red draw a small diagonal above the main body.
  8. Add a dot to the centre of the diamond. Wait until everything is dry and top of with a top coat!

I really recommend you look up and refer back to picture so you can see why you need all those little touches, and so you get a better picture, of how it should look.

So let me know if you guys try it! Tag me or send me photos of your own Team England Nails to @lovefromangelic on both twitter and Instagram! And send me some suggestions for other team nails!
 

L.F.A. Xx